
In this DIY tutorial, I’ll demonstrate how to build a paver patio in your backyard 100% by yourself using basic tools.
I did this project recently, and I’ve created the most thorough guide that is packed full of time-saving tips that you won’t find anywhere else.
Contents
- A list of tools and materials
- Essential features of a paver patio that lasts a lifetime
- How to build a paver patio step-by-step
- Three methods for cutting pavers
- Cost of a paver patio (and how much you can save)
- How long it takes to build a paver patio
Essential Equipment – Tools and Materials

Tools
- Landscaping rake
- Spade shovel
- Flat nose shovel
- Digging bar (only needed for hard-packed rocky soil)
- Pickaxe (optional)
- Wheelbarrow
- Standard level (24″ is fine, but longer is better)
- Line Level
- Mason line
- Measuring tape
- 6 – 24″ steel stakes (buy local)
- Rubber mallet
- Masons Chisel
- Hand tamper or plate compactor
- 6′ screed board (a straight 2×4 works just fine)
- Wet tile saw (optional but nice to have – you can rent one)
- Cuttoff saw with water feed (essential for curved cuts – you can rent one)
- Angle grinder (helpful for smaller, more detailed cuts)
Safety Equipment
- Gloves
- Eye protection
- Earplugs
- Knee pads
- Respirator
Materials
- Concrete paver blocks
- Paverbase panels
- High-quality geotextile fabric (rated for at least 30 years)
- Leveling sand (1 50lb bag per 12 sq feet of patio)
- Fine jointing sand (or polymeric sand)
- 1/2″ rebar
- Edge restraint
- 10″ landscaping spikes
Pavers used for this project:
- Brand: Belgard
- Color: Riviera
- Style: Cataline Grana – A mix of 6×12, 9×12, and 12×12 inch pavers.
Paver Patio Construction Essentials
There are two primary methods for building a paver patio, and both integrate the essential components of a patio that lasts.
Here’s a diagram showing the typical construction of a paver patio.
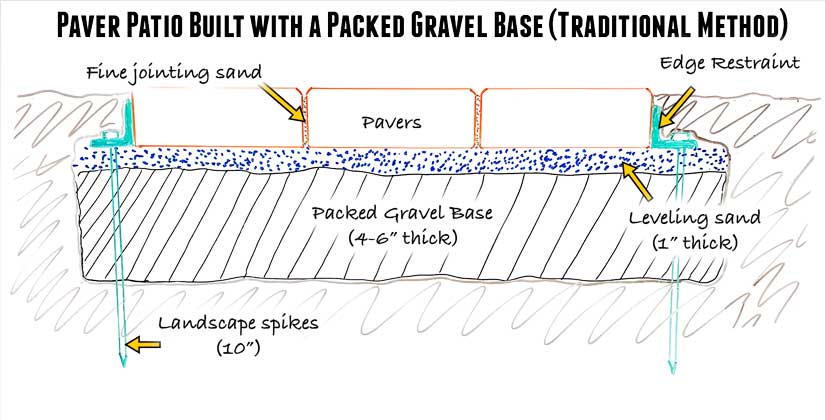
You’ll notice a few key features.
First, you have the base. This can be either a packed gravel base that is 4-6” thick. This is what stabilizes your pavers. If you skip the base and put pavers directly on the ground, your patio will quickly become uneven, pavers will crack, and your patio won’t last.
Another critical component is leveling sand. This is necessary to create a near-perfectly flat surface to place your pavers on. Without this layer, it’s very difficult to build a flat patio.
Then you have the edge restraints. These hold the pavers together and keep them from migrating away from each other. Even if you pack dirt around the pavers, you still need an edge restraint if you want your patio to look great for years to come.
Jointing sand. The last component is sand to fill the small gaps between the pavers. This is different than the leveling sand (it’s finer). This only fills the gaps; it locks the pavers together and completes the install.
Finally, your patio must be graded (i.e., sloped) so that water can drain without pooling. You always want water to drain away from your house and to work with the existing grading on your property.
The second way to build a paver patio has all of the same components, just arranged slightly differently and with the gravel base being replaced with something called a paverbase panel.
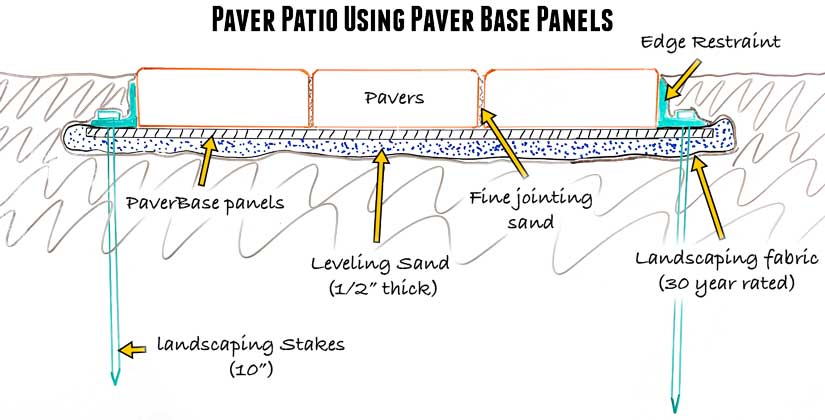
Here, again, it has all of the same components, but it requires a LOT less digging.
These concepts are explained in more detail in the accompanying video, which I highly recommend watching (see below).
How to build a paver patio (Step by step)
Step 1 – Planning your paver patio
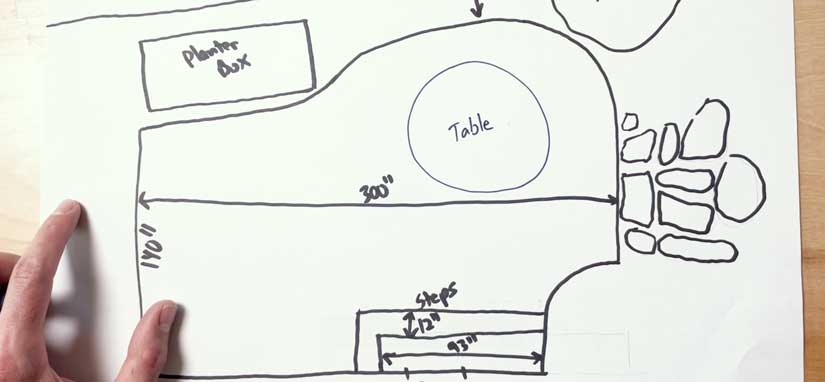
The first step is to plan your patio design. Figure out where you want it, the pavers you want to use, how big it will be, and whether it needs to align with any existing surfaces.
For example, in the patio I used in the video above, I had a flagstone patio that I wanted the pavers to be level with. So I planned based on that.
Invest some time to think about how the patio will be used. Do you need room for a fire pit, or will you just place patio furniture on it? Do you want enough space for your kids to play?
Once you know which pavers you will be using (and their thickness), you can figure out how deep you need to dig.
The depth you dig will depend on which method you will use. Most pavers are 2 3/8” thick. If you plan to use paver base panels and standard pavers, you’ll need to dig down about 3 5/8”. If you are going to use a packed gravel base, you’ll need to dig down at least 7 3/8” so you can get the minimum 4” gravel base, 1” layer of sand, and then the thickness of the pavers.
Step 2 – Prepping to dig
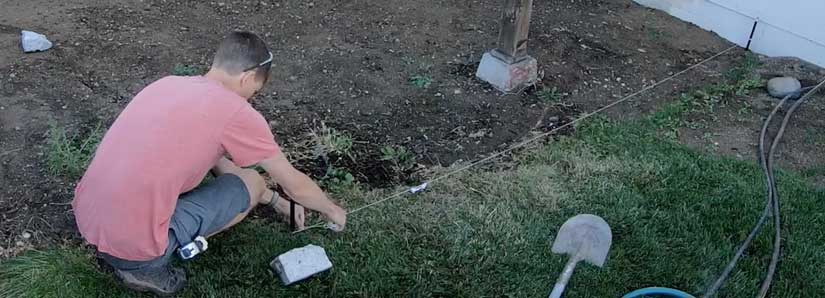
Start by clearing the area to make room to work. Then hammer 24” steel stakes along the outside edges of your patio (at the corners and where it meets up with other surfaces, and string a line between them.
Your goal is to string the lines so they represent where the finished patio will be when you are done. That way you can use the lines to guide you as you dig and prepare to lay pavers. You may need to dig a bit to get the lines at the right height; that’s normal.
The lines will also need to represent the grading (slope) of your patio as well. To figure out the grade, measure the distance between the stakes at the high and low sides of your patio in feet, then multiply that number by 1/4 of an inch to calculate the amount of drop for a 2% grade.
Once you have that number, use a line level to string a line that is perfectly level between those stakes. Then, either drop the low side or raise the high side by the amount you calculated so that, again, your line represents where you want the finished surface of your patio to be at the appropriate grade.
Let’s say your patio is 10’ long, then the low side of the patio will be about two and a half inches lower than the high side (10 x .25” = 2.5”).
So you’d want to drop the line on the lower side of the patio by 2.5”. Of course, you could move the high side up 2.5” instead or even split the difference, but the point is, you’re trying to get the lines you’ve strung to represent the finished patio with the appropriate grade.
If a 2% grade is too much slope for some reason, you can go as low as a 1% grade, which is 1/8 of an inch of drop per foot. Please note that the less grade you have, the flatter you need to make the patio to avoid water puddling.
Taking your time here can save you loads of time and lead to a better build.
Step 3 – Digging
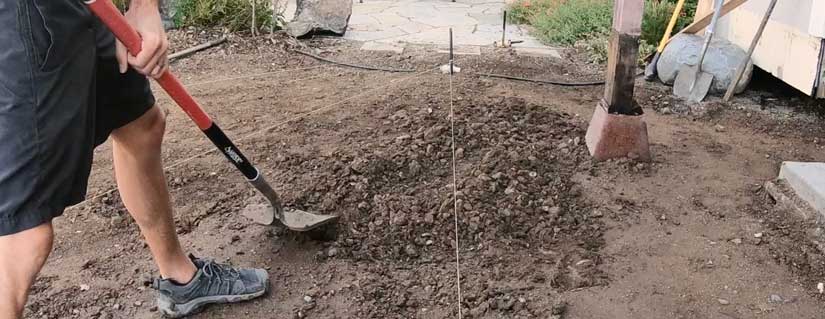
Now it’s time for the hardest part of this whole process: digging.
And before you dig, do two things.
First, call 811—it’s a free nationwide service. Always call before you dig because they’ll tell you if there are any underground pipes or things you need to avoid.
Secondly, figure out what you’ll do with the dirt because you’ll only want to move it once. I simply used a wheel barrow to dump it on my street, and then paid $200 for someone to haul it away when I was ready.
Start by digging along the lines and use them as your guide to dig to the appropriate depth. Then, you can dig out the area in between the lines to create a flattish surface.
This is a lot of work, especially if you have hard packed rocky soil. You may need a pickaxe to break it up. Spraying the dirt down with a hose the day before you dig makes it a lot easier and reduces dust. For softer soil, you can use a tiller to help break up the dirt. And if you happen to have an excavator laying around, you can use that.
You’ll be using the lines you installed constantly throughout this digging and grading process. That’s why I prefer to use 24” steel stakes, hammer them deep into the ground, and then mark where I want the line to sit with a Sharpie. That way, when I accidentally move the line while digging, I can quickly get it back in place without wasting time with the line level again.
Continue digging until it’s relatively flat and close to the depth you want it to be.
Also, dig about 6 inches past where the finished edge of the patio will be so you have some room to install the edging and make adjustments.
Step 4 – Install sprinkler lines and other features
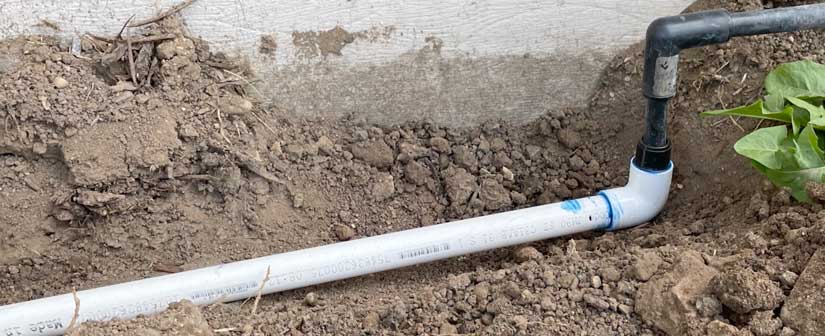
Before spending time flattening the dirt, now is a perfect time to install any other features you need on your patio. If you are installing a permanent shade structure, you want to install the concrete footings before laying the patio.
If you need to run sprinkler lines under the patio, do that now. Just make sure to use rigid PVC pipe for any sprinkler or irrigation lines. Never run black drip line under a patio because it will get smashed.
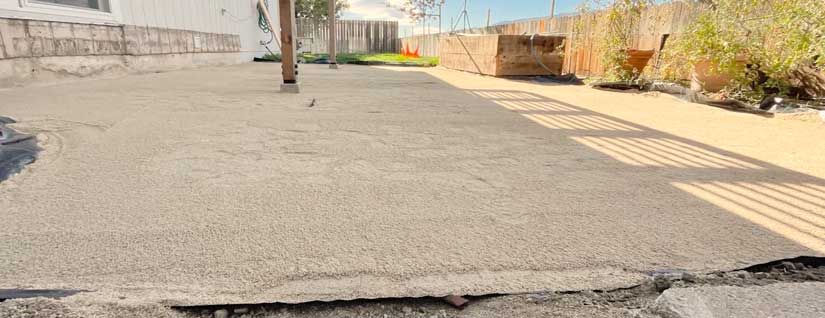
Step 5 – Final grading & flattening
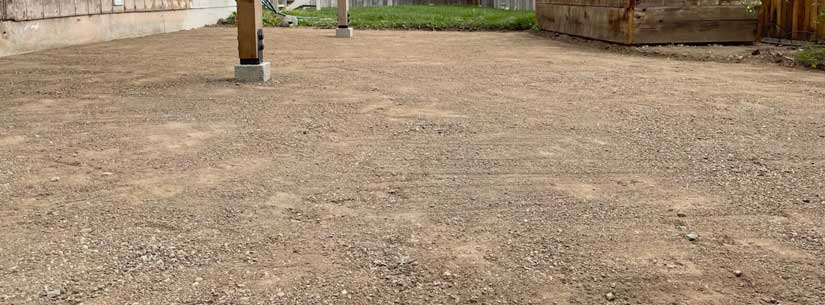
Flatten and pack the dirt down so it’s flat within 1/4”. That means you don’t want any high spots that stick up more than a quarter of an inch or any low spots that are more than 1/4” below the surface.
I find it helpful to move another line along the existing lines to gauge the depth as I go.
Use a straight edge to even the dirt out before tamping it down. A straight 2×4 works perfectly fine here.
This is a time-consuming process. You’ll probably need to make several passes of flattening and tamping the ground before it’s flat enough to proceed to the next step.
But it’s well worth it because when you’re done you’ll have a nice flat patio where water drains right off when it rains instead of an uneven patio where water pools on the surface like I show in the video.
Step 6 – Landscaping fabric
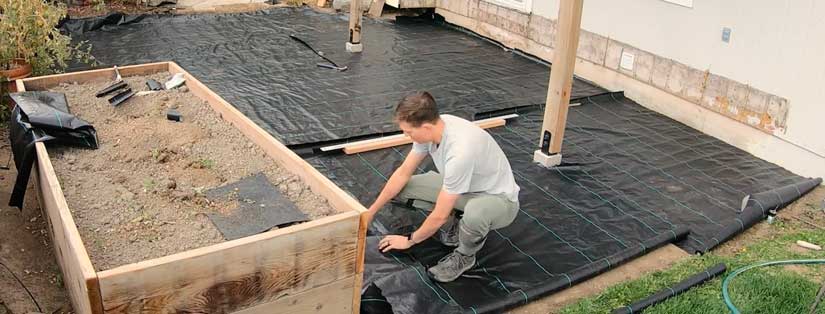
Lay a high-quality Geotextile landscaping fabric. Find the best stuff you can, ideally something rated for 30 years. Overlap the edges about 6” anywhere there is a seam and hammer in with landscaping staples to hold it down.
Leave at least six extra inches around on the edges because you’ll need it later.
I recommend waiting to lay the landscaping fabric until you are ready to put the sand down. Otherwise, the wind will tear it to shreds. And I recommend waiting to put the sand down until you have your pavers on hand or ready to be delivered in the next day or two.
Step 7 – Leveling sand
Next, you’ll lay a 1/2” layer of sand evenly over the landscaping fabric. The easiest way to do this is to buy some 1/2” thick rebar from your local supply store. It’s cheap and available in different lengths. And don’t tell anyone I told you this, but you can return it to the store when you’re done.
Lay the bars about 5’ apart and then add the sand, being careful not to get sand underneath the seams of the fabric.
Even the sand out with a rake, then screed it flat with a 6’ flat edge, using the rebar as a guide. You can use a 2×4 for this step if you can find a straight one. The rebar provides a guide for the screed board to produce a perfectly flat edge.
You can tamp the sand down before adding more sand and screeding a second time to create an even flatter patio.
Once a section is complete, you can remove the rebar and move on to the next section, moving from one side of the patio to the next until the entire thing is covered in a nice flat layer of sand.
You can purchase this sand in 50 lb. bags at most hardware stores, and each bag will cover about 12 square feet of patio. However, you can save a lot of money and plastic by purchasing a half yard from your local landscaping supplier. A half yard can easily fit in your truck bed, will cover about 330 square feet at 1/2” depth, and is the equivalent of 28 50 lb. bags of sand.
Step 8 – Paverbase panels
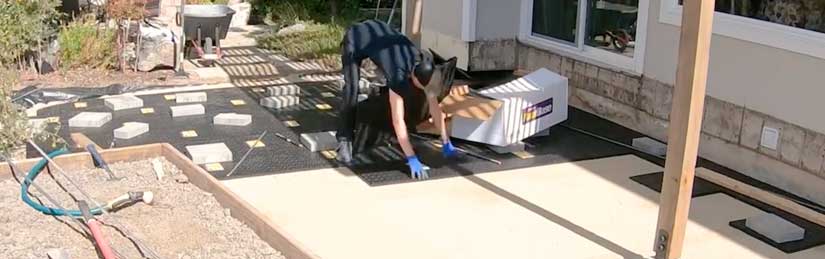
This next step is very easy. Lay the paverbase panels in a brick-like pattern, staggering the seams. These are easily cut with a razor knife and the extra pieces can be recycled.
Since the panels only weigh one pound each, this can be challenging on windy days. I had to place pavers on each corner as I laid them just to keep them in place.
You can purchase these individually and in cases of 20. Each panel weighs one pound and covers about 5 sq. feet of area, so a case will cover 100 sq. feet. Buying by the case will save you about 20%, so buy a combo of individual panels and cases to get the exact amount you need.
Step 9 – Lay the pavers
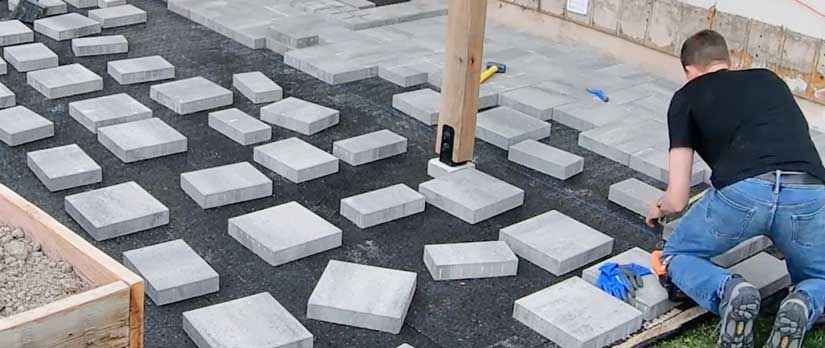
It’s finally time to start laying the pavers. However, before you just start slapping them in, it’s best to snap a chalk line to guide your first row. Don’t attempt to use the panels to guide you, or even your foundation, as they are unlikely to be perfectly straight.
You can butt the pavers right up against the foundation as long as you can maintain a straight line. You may want to snap several chalk lines while installing the first few rows to make sure the pavers stay straight as you go.
Use a rubber mallet to tap the pavers or make slight adjustments. This helps keep the seams between the pavers tight, which is important, because if they don’t stay tight, you’ll likely have large gaps further down the patio.
You’ll want to start near any buildings or structures and work your way down from one side to the next so you don’t have to make any cuts to fit the pavers next to your house. You’ll want to limit cuts as much as possible. You’ll likely have at least a few, and I’ll show you the easiest way in a minute here, but try to avoid excess cutting with a bit of planning.
The paver I used in this project are made by Belgard. The color is Riviera, and there are three sizes of pavers. 12” x 12”, 9” x 12”, and 6” x 12”. The variation in size looks great, but maintaining the pattern took a lot longer than it would have if I just had a single size of paver.
You want to avoid having small pieces on the outside edge because those pieces will move easily. This is why pavers often have a soldier course as edging. A soldier course is a line of full sized pavers the outline the patio. This strengthens the edge by having larger pavers all the way around. You don’t need a soldier course as long as you ensure there are not small pavers on the outside edge.
Step 10 – Edge Restraint
Once the pavers are cut and in place, the next step is to install the edge restraint.
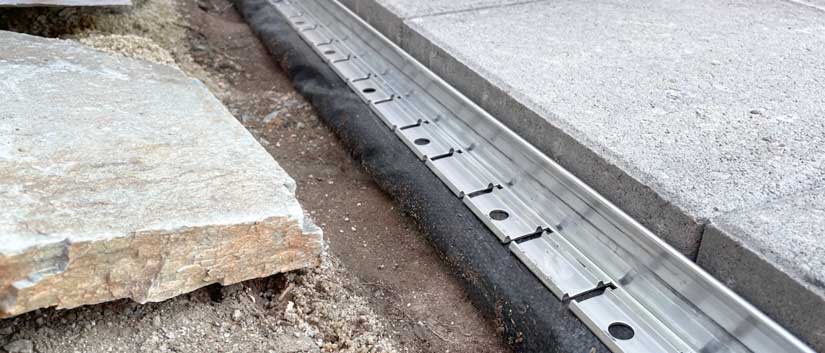
Start by first trimming the extra paverbase panels so there is just enough for the edge restraint to sit on. You can use the edge restraint as a guide for cutting it if you like. Then, fold the landscaping fabric over the edge so it captures the sand, put down the edge restraint, and hammer in the landscape spikes.
This last step is essential to locking everything in place; otherwise, your pavers will slowly shift and migrate away from each other, creating gaps and weaknesses.
Now you can see why you want to dig a little wider than the finished patio and why you need a bit of extra landscaping fabric on the edges.
I recommend using an aluminum edge restraint to minimize the use of plastic. Plus, there are a great option and can easily be bent to fit any curves.
Step 11 – Jointing Sand
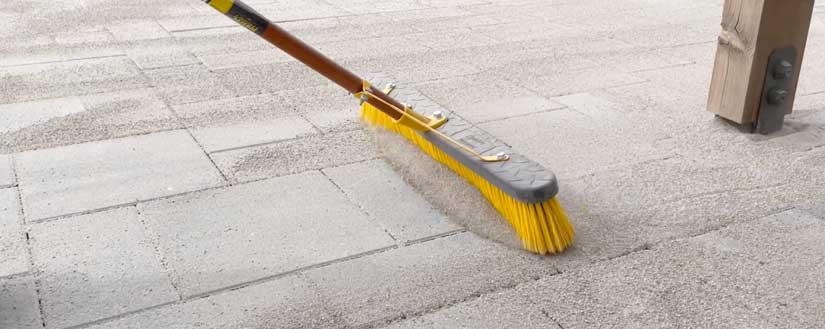
Chances are, a few of your pavers still wobble when you walk on them at this point, but don’t worry—the next step is to install sand, and it will fix this.
You’ll poor the sand onto the patio directly from the bag. Then sweep it with broom until the joints fill up. Sweep in multiple directions back and forth until you don’t see any unfilled gaps.
Then, tamp down the patio with a hand tamper to vibrate the sand deep into the cracks. I taped cardboard to the bottom of my tamper to dampen the impact and protect my pavers.
Repeat this step until all joints are filled. It will take two or three passes and it’s gonna take longer than you think.
For most pavers, you’ll need a special type of sand for this process. And there are two options. You can buy fine jointing sand or polymeric sand.
Polymeric sand is nice because it reduces weed growth. However, it’s more expensive, more difficult to install, and it’s made with plastic adhesives that break down over time, releasing microplastics into the environment.
Fine jointing sand, which is just a fine sand, is easier to apply, has no risk of staining your pavers, and is not filled with hormone-disrupting plastics.
I used polymeric sand on this project, but if I could go back, I would use fine jointing sand.
If using polymeric sand, follow the instructions on the bag to spray and wet the sand to set it in place permanently.
Step 12 – Enjoy!
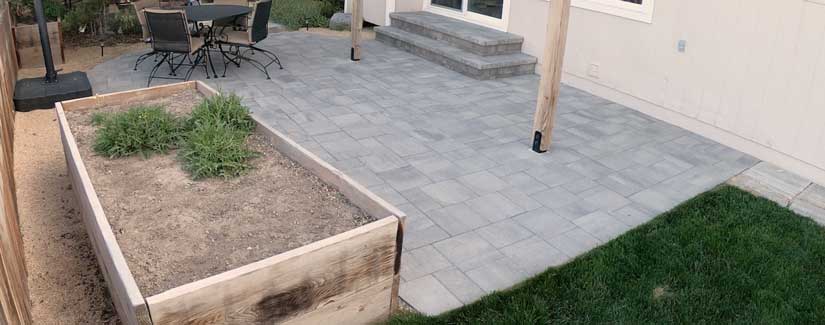
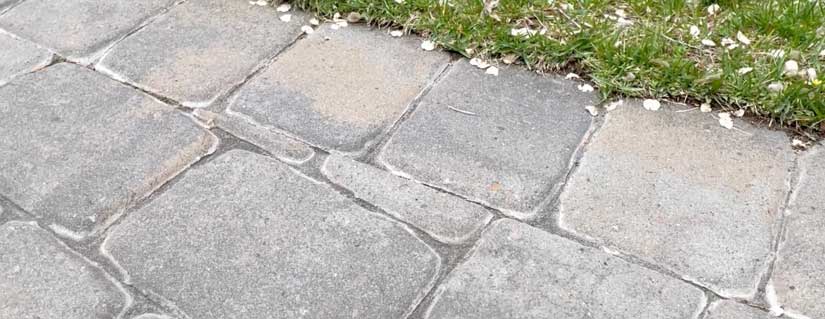
At this point, you’re pretty much done. All that is left to do is fill in the gaps on the sides of the patio so it’s level with the ground, and you have a beautiful, functional addition to your landscape that will last a lifetime.
Installing a paver patio can transform your yard. They look great and add functional space as you can see here.
My favorite part is that they are low-maintenance and don’t require frequent staining like my old deck.
Three ways to cut concrete pavers
You’ll probably need to make a few cuts, so here’s how to do it.
#1 – Wet tile saw (best method for straight cuts)
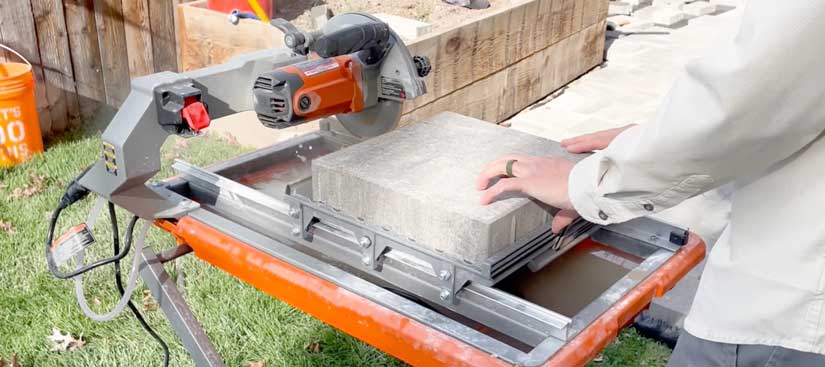
The easiest way is to use a wet tile saw. I highly recommend renting one if you have a lot of straight cuts to make. It’s the easiest tool to use and it almost completely eliminates the dust. The only downside is you can’t do curved cuts.
#2 – Cutoff saw with hose attachment

The second-best option is a concrete cutoff saw with a diamond blade. If you’re cutting any curves on your patio, this is essential. This is the tool that most pros use. If you rent one, get one with a hose attachment to feed water as you cut because cutting pavers is extremely dusty and is guaranteed to piss off the neighbors and mess up your lungs.
#3 – Angle grinder

The third and least ideal option is an angle grinder; This can work just fine if you only have a few pavers to cut, but it’s super slow and dusty.
But how about cutting curves?
 Some pros recommend cutting the curves while the pavers are in place, but when you’re using paver base panels, the risk of cutting through them is too high, so I opted to move each one and cut them individually.
To draw my curve, I placed a kettlebell where I wanted the center of the curve to be and tied a string to a pencil so I could draw the curve. Then, I made a template out of an old piece of plywood to speed things up for the other curves.
Once you are happy with your curves marked in pencil, use a Sharpie to draw the final cut line. Otherwise, the pencil will wash away instantly while trying to cut if using a wet saw.
Regardless of how you cut pavers. This is a time-consuming process, which is why contractors charge extra for patios with a lot of cutting. So be prepared for this to take a bit longer than you expect.
How much does a DIY paver patio cost?
The cost will depend on several factors, like which pavers you choose, if you decide to rent tools, and where you live.
However, to give you an idea, my patio was 330 square feet, and the total cost was approximately $3,500, including everything from the rental cost of the concrete saw to the expense of hauling away the excess dirt. This does NOT, however, include the blocks I used for the stairs since I’m assuming most people won’t be building stairs.
How much does a professionally installed paver patio cost?
For a basic 330-square-foot paver patio, most contractors will charge between $7,500 and $10,000, including materials. That may seem expensive, but it’s a lot of work even when using heavy machinery.
And take note that this is for a basic paver patio. If you have a complex design with curved cuts or need to install sprinkler lines below it, the cost will increase. And, if you need to demo a deck or fix the grading on your property, the cost can be significantly higher.
How much can you save by building your paver patio?
You can expect to save, at a minimum, between $4,000 and $6,000 if you build your patio yourself, and you are building a very basic patio.
On my project, I estimate that I saved at least $15,000 overall. That’s because there was a lot more work than just installing pavers. I had curved cuts, sprinkler lines to install, a large deck to demo, pergola footings to install, steps up to my patio door, siding repair, and I built a planter box.
Well worth it since I enjoyed most of the work, ended up with a better install than if I hired someone, and I only worked a couple of hours here and there while taking my time on the project. Actually, it was a great way to break up my work day of sitting in the office.
How long does it take to build a paver patio by yourself?
If you worked really hard and knew what you were doing, you could knock out a 300 sq foot patio in about a week. However, I wouldn’t recommend that for most people.
I did this project over the course of the summer and fall, working a couple of hours here and there. I was 40 years old at the time. If I had to do this on a tight timeline, I would definitely hire some help. My aging body would get crushed if I tried to rush it.
Of course, if you rent heavy machinery like a plate compactor and excavator, you can do it a lot faster, but for most people, that doesn’t make sense.
So, unless you are super fit or have help, give yourself at least a few weeks to allow your body to recover in between work days.
Are Brock paver base panels worth it?
Let’s break it down.
The paver base panels cost $757, which isn’t cheap. However, they saved me a lot of labor and reduced some expenses, including:
- Digging down an additional 4 inches, which would have taken me several days of hard labor.
- They saved me from disposing of an extra 4 yards of dirt, which would have cost $300.
- They saved me from buying 4 yards of gravel base material, which would cost $250.
- And they saved me from having to move and pack the gravel base, which would have taken me about a day of hard labor.
So, they only cost me an extra $200 when you factor in these savings, but they probably saved me five days of very hard labor. I’ll make that trade any day.
Are the paver panels as good as a gravel base? I guess time will tell, but so far, I don’t see a clear benefit of a gravel base over this installation. I’ve now had this patio for two years, and I’m very happy with it.
Conclusion
Building a paver patio is a labor-intensive project, but it can completely transform your backyard, making it far more enjoyable to spend time outdoors.
Also, it’s nice to work outside, sweat a bit, and then step back and marvel at your handiwork.
If you decide to build a paver patio, please come back here and share your experience. I, and other readers, would love to hear your story.
Turn your DIY skills into a profitable side business and make over $100 per hour.

Home repairs and improvements are in high demand, and there aren’t enough service pros to fill that demand.
This is a massive opportunity for any handy person who enjoys helping people.
If this sounds interesting to you, I recommend reading this free report.
You’ll learn ten profitable services you can offer TODAY without a contractor’s license.
Then, I’ll send you more information about what it takes to build a profitable and enjoyable handyman business.
FREE REPORT: 10 Profitable Handyman Services You Can Offer WITHOUT a Contractor License


